Difficulty Level: Advanced
Prerequisite: Access to re:amaze account, access to google cloud console with ability to create Cloud Run service, go programming language, access to slack account.
Takeaway: This article will show you how you can set up simple REST endpoint which will receive data from your webform/application and pass it to re:amaze and notify your team via Slack.
Introduction
Reamaze offers a comprehensive suite of features, including a unified inbox, live chat, automated workflows, and detailed analytics. Reamaze not only helps manage customer interactions but also seamlessly integrates with various platforms, making it a versatile tool for our needs. This makes it an ideal choice for handling support requests and inquiries from various channels (omni channel solution), including our website forms.
To make the integration process smoother, we developed and open-sourced under the MIT License reamaze-go package https://github.com/meant4/reamaze-go. This package allows developers to effortlessly connect their websites/applications and other source of requests to Reamaze channels, enabling automatic ticket creation and support management. We utilized Google Cloud Run to create an simple API endpoint, which use reamze-go to connect webform with our re:amaze account.
In this article, we will guide you through the step-by-step process of integrating your website forms with Re:amaze using the reamaze-go package. By following this guide, you can automate support tickets and notify your team members via Slack whenever a new entry is received in Re:amaze.
Why to add web form data to re:amaze?
Storing web form data in Re:amaze offers several key benefits that enhance both customer service and operational efficiency. Re:amaze provides a centralized platform where all customer interactions, including web form submissions, are automatically logged and organized. This ensures that customer queries are easily accessible to support teams, enabling quicker response times and better follow-up.
Re:amaze integrates seamlessly with various CRM systems, allowing businesses to maintain a cohesive record of customer interactions across multiple channels. The platform's advanced analytics tools also help in tracking and analyzing form data, providing valuable insights into customer behavior and feedback. By utilizing Re:amaze for web form data storage, businesses can improve their customer service workflow, maintain organized records, and gain actionable insights to drive customer satisfaction and retention.
Why to use Google Cloud Run as the solution for hosting REST endpoint?
Using Google Cloud Run for hosting REST endpoints is a strategic choice due to its seamless scalability, cost-effectiveness, and ease of use. Cloud Run allows developers to deploy containerized applications effortlessly, ensuring that your REST API can handle varying levels of traffic without manual intervention. Its serverless nature means you only pay for the compute time your application uses, which can lead to significant cost savings compared to traditional server-based hosting.
Cloud Run offers automatic scaling, robust security features, and integration with other Google Cloud services, simplifying the deployment and management processes. With its support for any programming language and the ability to run stateless containers, Cloud Run provides a flexible and powerful environment for hosting REST endpoints, enabling rapid development and deployment cycles.
Why to use Re:amaze and Slack integration?
Integrating Re:amaze with Slack creates a powerful synergy for customer support and team collaboration. This integration allows customer service teams to receive real-time notifications about customer inquiries directly in Slack, ensuring prompt responses and reducing the need to switch between platforms.
With Re:amaze and Slack working together, support agents can discuss and resolve customer issues more efficiently by leveraging Slack's robust communication tools. By combining the strengths of Re:amaze's customer service capabilities with Slack's collaboration features, businesses can improve response times, foster better teamwork, and ultimately enhance customer satisfaction.
Let's define the process and information flow
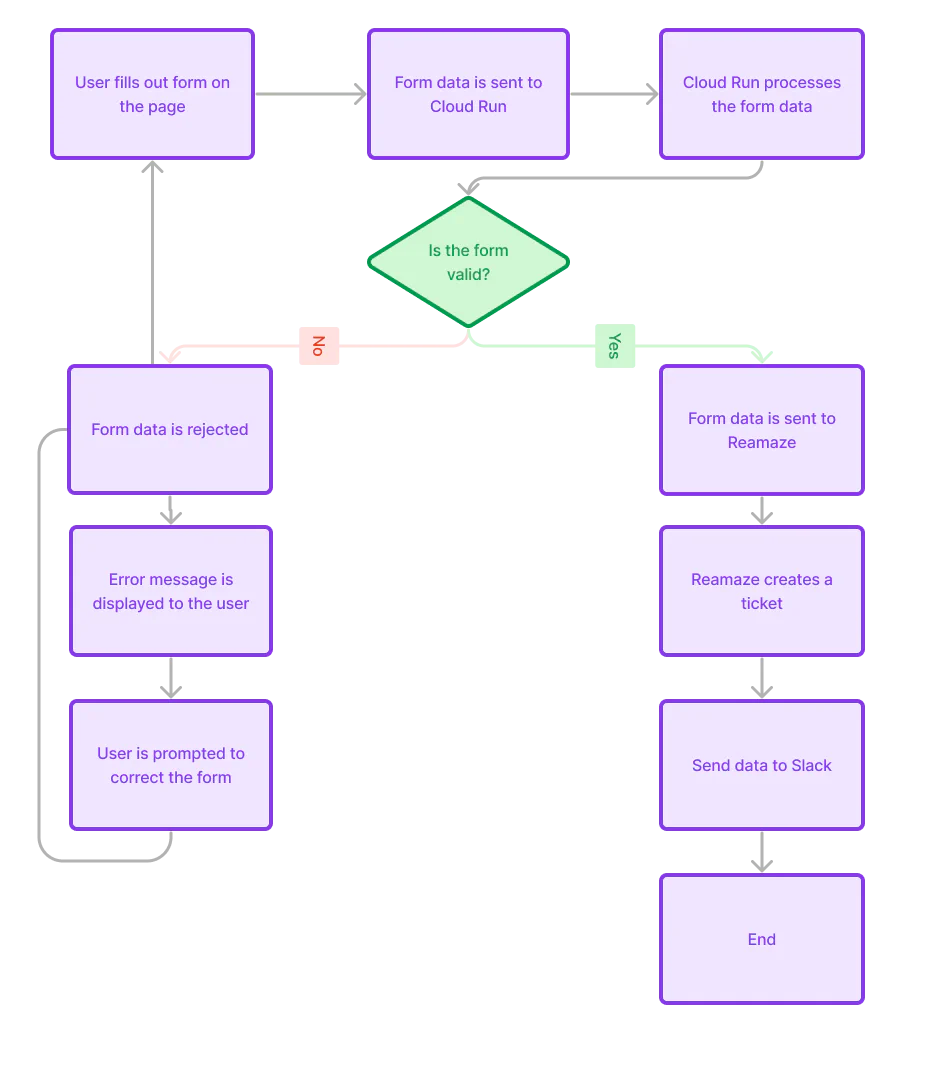
For the purpose of this article we have defined the following process in which we are handling web form submission data.
Here's a step-by-step description of the flow:
- 1. User Submission: The user fills out a form on the webpage
- 2. Send to Cloud Run: The form data is sent to Cloud Run for processin
- 3. Process Data: Cloud Run processes the form data to determine its validity
- 4. Form Validation Check:
- Valid: If the form is valid, the data is sent to Re:amaze
- Invalid: If the form is not valid, the process follows a different path
- 5. Invalid Form Handling:
- The form data is rejected
- An error message is displayed to the user, prompting them to correct the form
- The user corrects the form and resubmits it, starting the process over
- 6. Valid Form Handling:
- The valid form data is sent to Re:amaze
- Re:amaze creates a support ticket using the form data
- The data is then sent to Slack via Re:amaze Slack integration, notifying the team (support,sales,…)
- 7. End: The process ends here, completing the data handling flow

Setting up Google Cloud
To deploy a Cloud Run container using Cloud Build we need to set up Google Cloud Platform (GCP). Follow these steps to set up Google Cloud Project:
Step 1: Create a GCP Project
Create a New Project:- Go to the GCP Console: GCP Console
- Click on the project dropdown at the top and select "New Project"
- Enter a project name and billing account, then click "Create."
Step 2: Enable Required APIs
Enable APIs:- Go to the APIs & Services Dashboard:- APIs & Services
- Click "Enable APIs and Services"
- Enable the following APIs:
- Cloud Build API
- Cloud Run API
- Container Registry API (or Artifact Registry API)
Step 3: Set Up Authentication
1. Install Google Cloud SDK:- If you haven't already, download and install the Google Cloud SDK from Google Cloud SDK
- Open a terminal and run:
1
2
gcloud auth login gcloud config set project YOUR_PROJECT_ID
Step 4: Prepare Your Application
Create a Dockerfile:- In your project directory, create a `Dockerfile` that defines your application environment. Here's our example Dockerfile for REST endpoint app:
| |
Step 5: Create a Cloud Build Configuration File
Create cloudbuild.yaml: | |
Step 6: Deploy to Cloud Run Using Cloud Build
Submit the Build: | |
Step 7: Verify the Deployment
Check the Cloud Run Service:- Go to the Cloud Run Console: Cloud Run Console
- Verify that your service is running and click on the URL to ensure it is working correctly
Optional: Automate Deployments with GitHub
1. Set Up GitHub Repository:- Push your project to a GitHub repository.
- Go to Cloud Build Triggers: Cloud Build Triggers
- Click "Create Trigger"
- Set up a trigger for your repository to run the build on commits to the main branch
By following these steps, you will have set up GCP to deploy a containerized application to Cloud Run using Cloud Build. This setup ensures your application is built, pushed to a container registry, and deployed to Cloud Run automatically.
Connecting Cloud Run Endpoint with Reamaze
Up until now we were preparing our environment to be able to send REST request to Cloud Run endpoint which will unmarshall request's payload and send it Reamaze. Before you try our sample server you need to get couple of things from your Reamaze account:
| |
To get your API_TOKEN https://BRAND.reamaze.com/admin/settings/api_token where BRAND is your brand name.
Once you have all REAMZE data you can set them up in your cloud build trigger (see our cloudbuild.yaml file above) or add them to dev.env file.
dev.env | |
Below you can see our example HTTP server which is ready to deploy to Cloud Run
main.go | |
You can find full example in reamaze-go repository in /examples/cloudrun folder https://github.com/meant4/reamaze-go.
To test your integration you can send POST request to /v1/sendmessage endpoint with empty payload and you should receive "Invalid JSON request." This means your endpouint is up and running.In our example the correct payload has a following form:
| |
The above example is our contact's form json data, we have skipped data validation part for clarity purposes.
Reamaze AI enhanced response and sentiment analysis
All messages being send to /v1/sendmessage endpoint are now being stored and handled by Reamaze. This means that beside standard features like search, filtering, assigment to proper department etc. we have some nice new features like "Improve My Response" with AI and Sentiment Analysis of the message. Below we are presenting the look of our previous section json data in Reamaze with red boxes around AI tools we have mentioned:
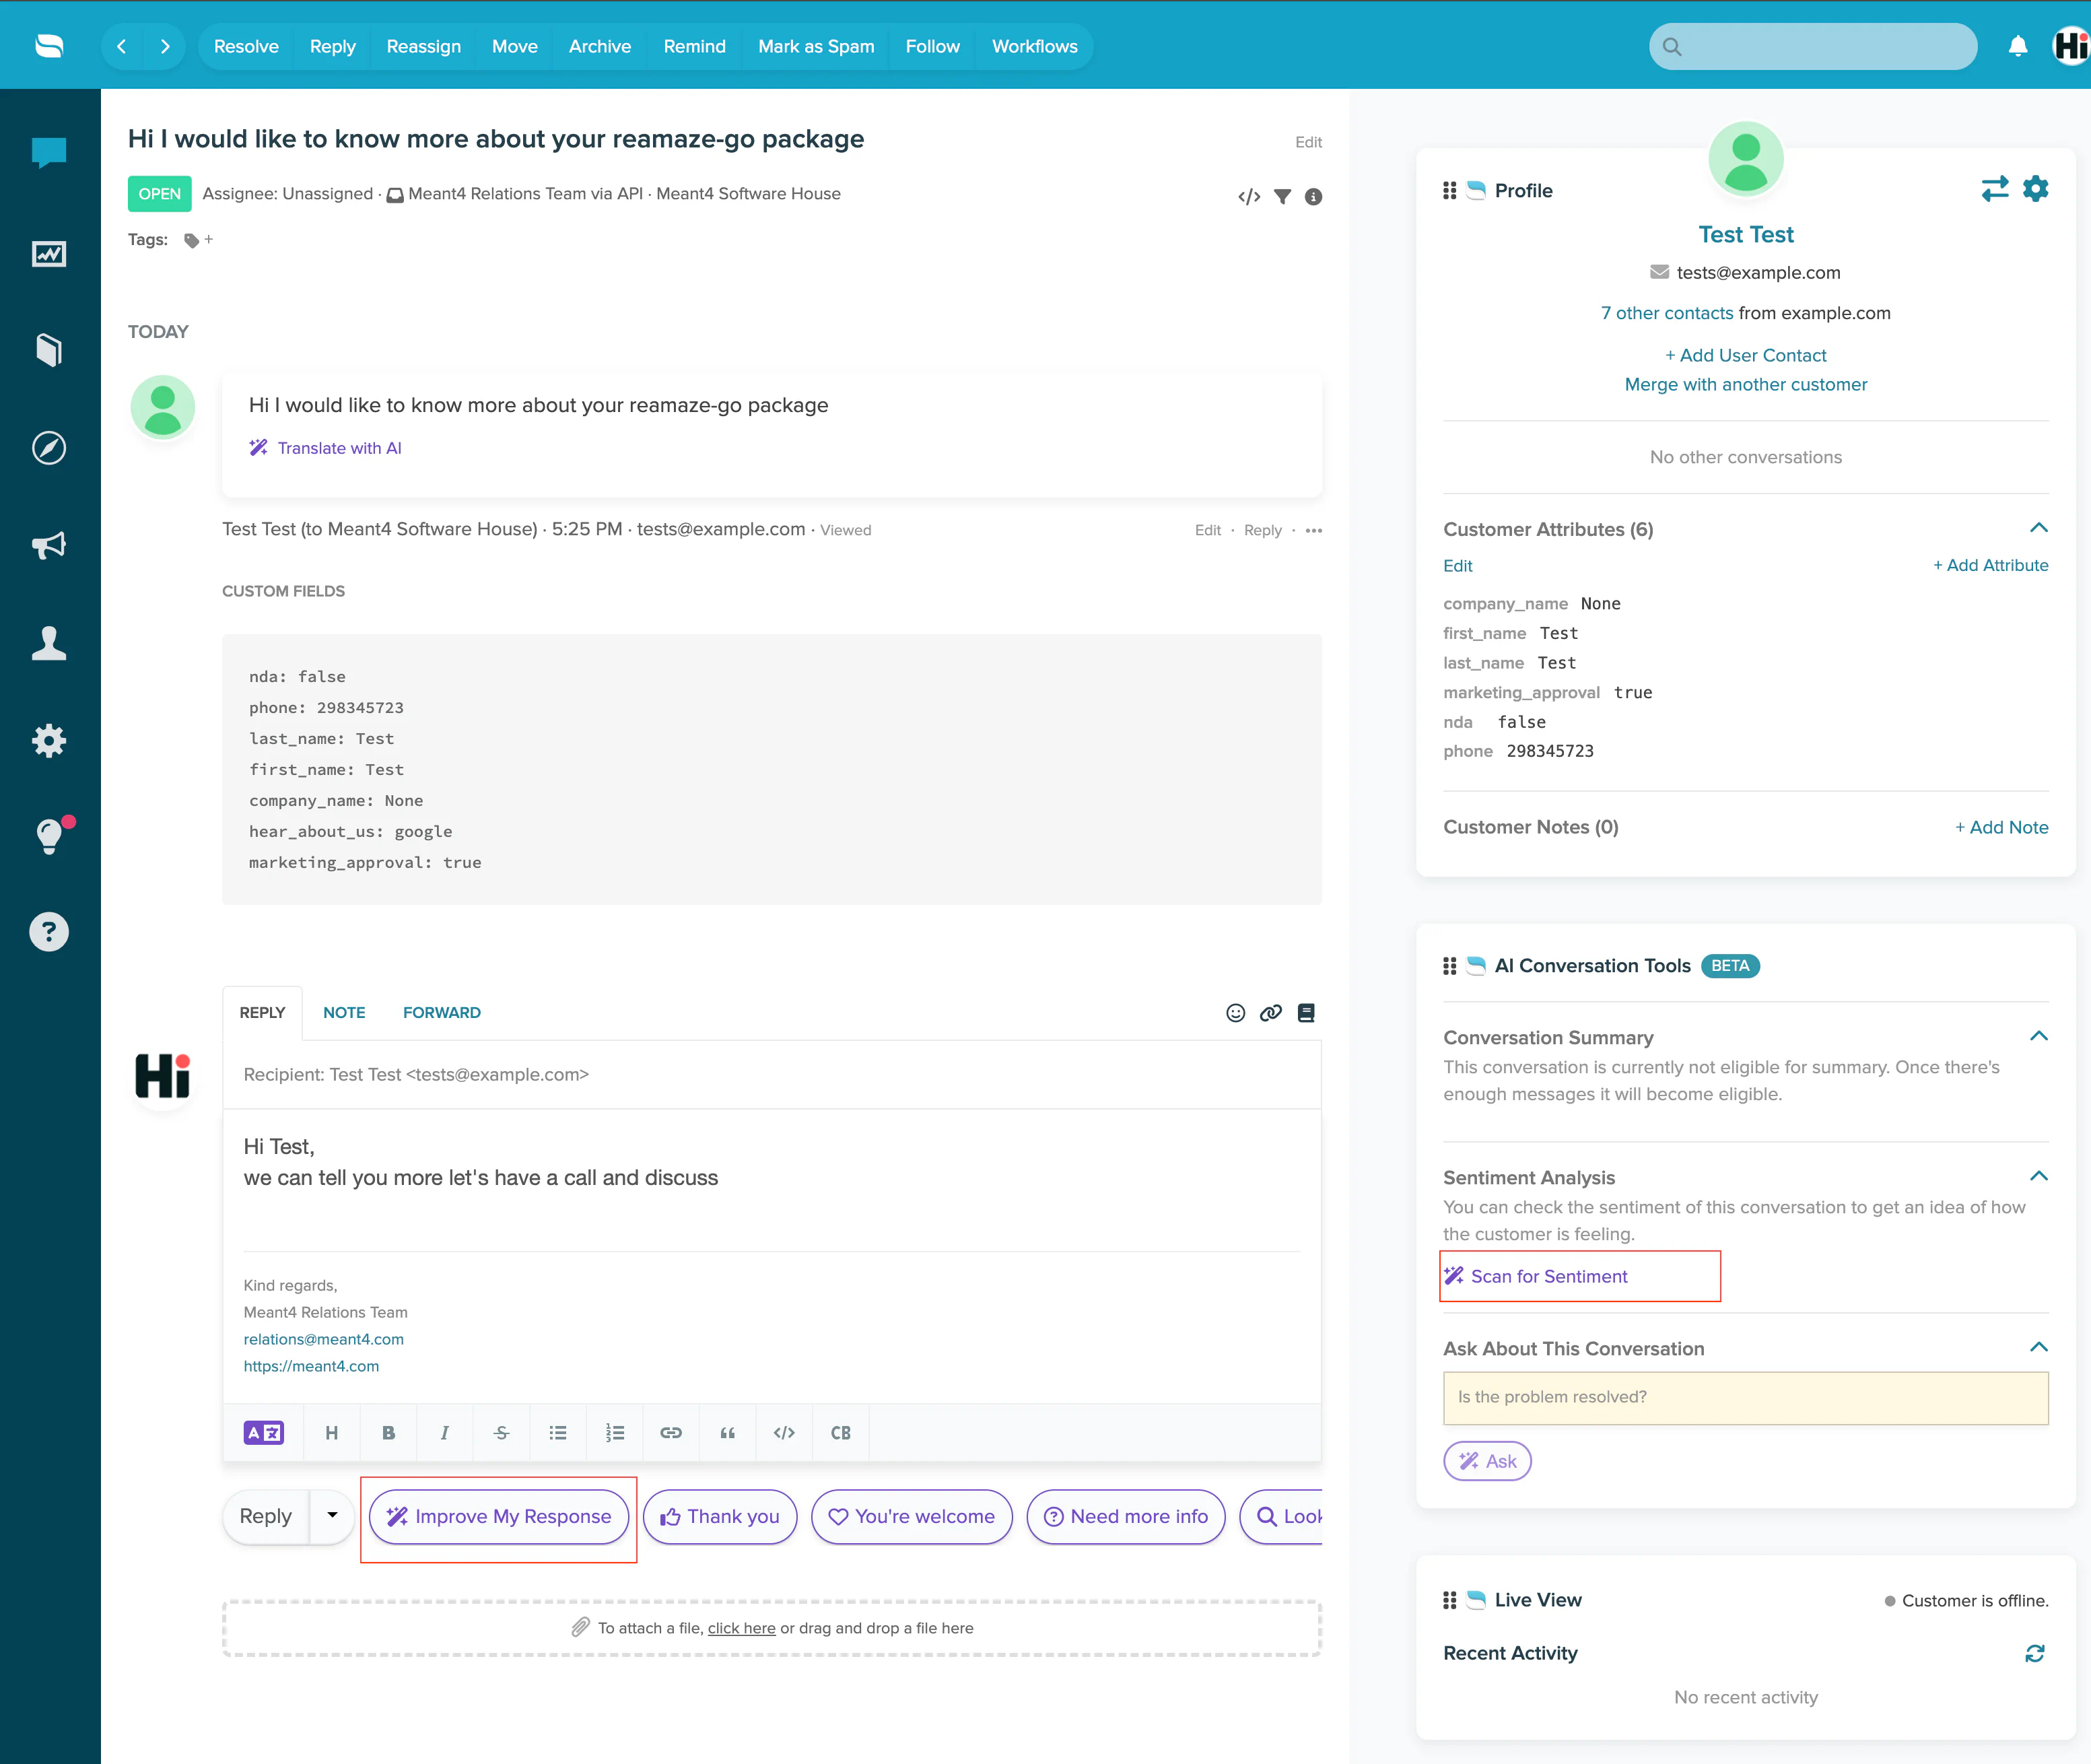
By providing simple response
| |
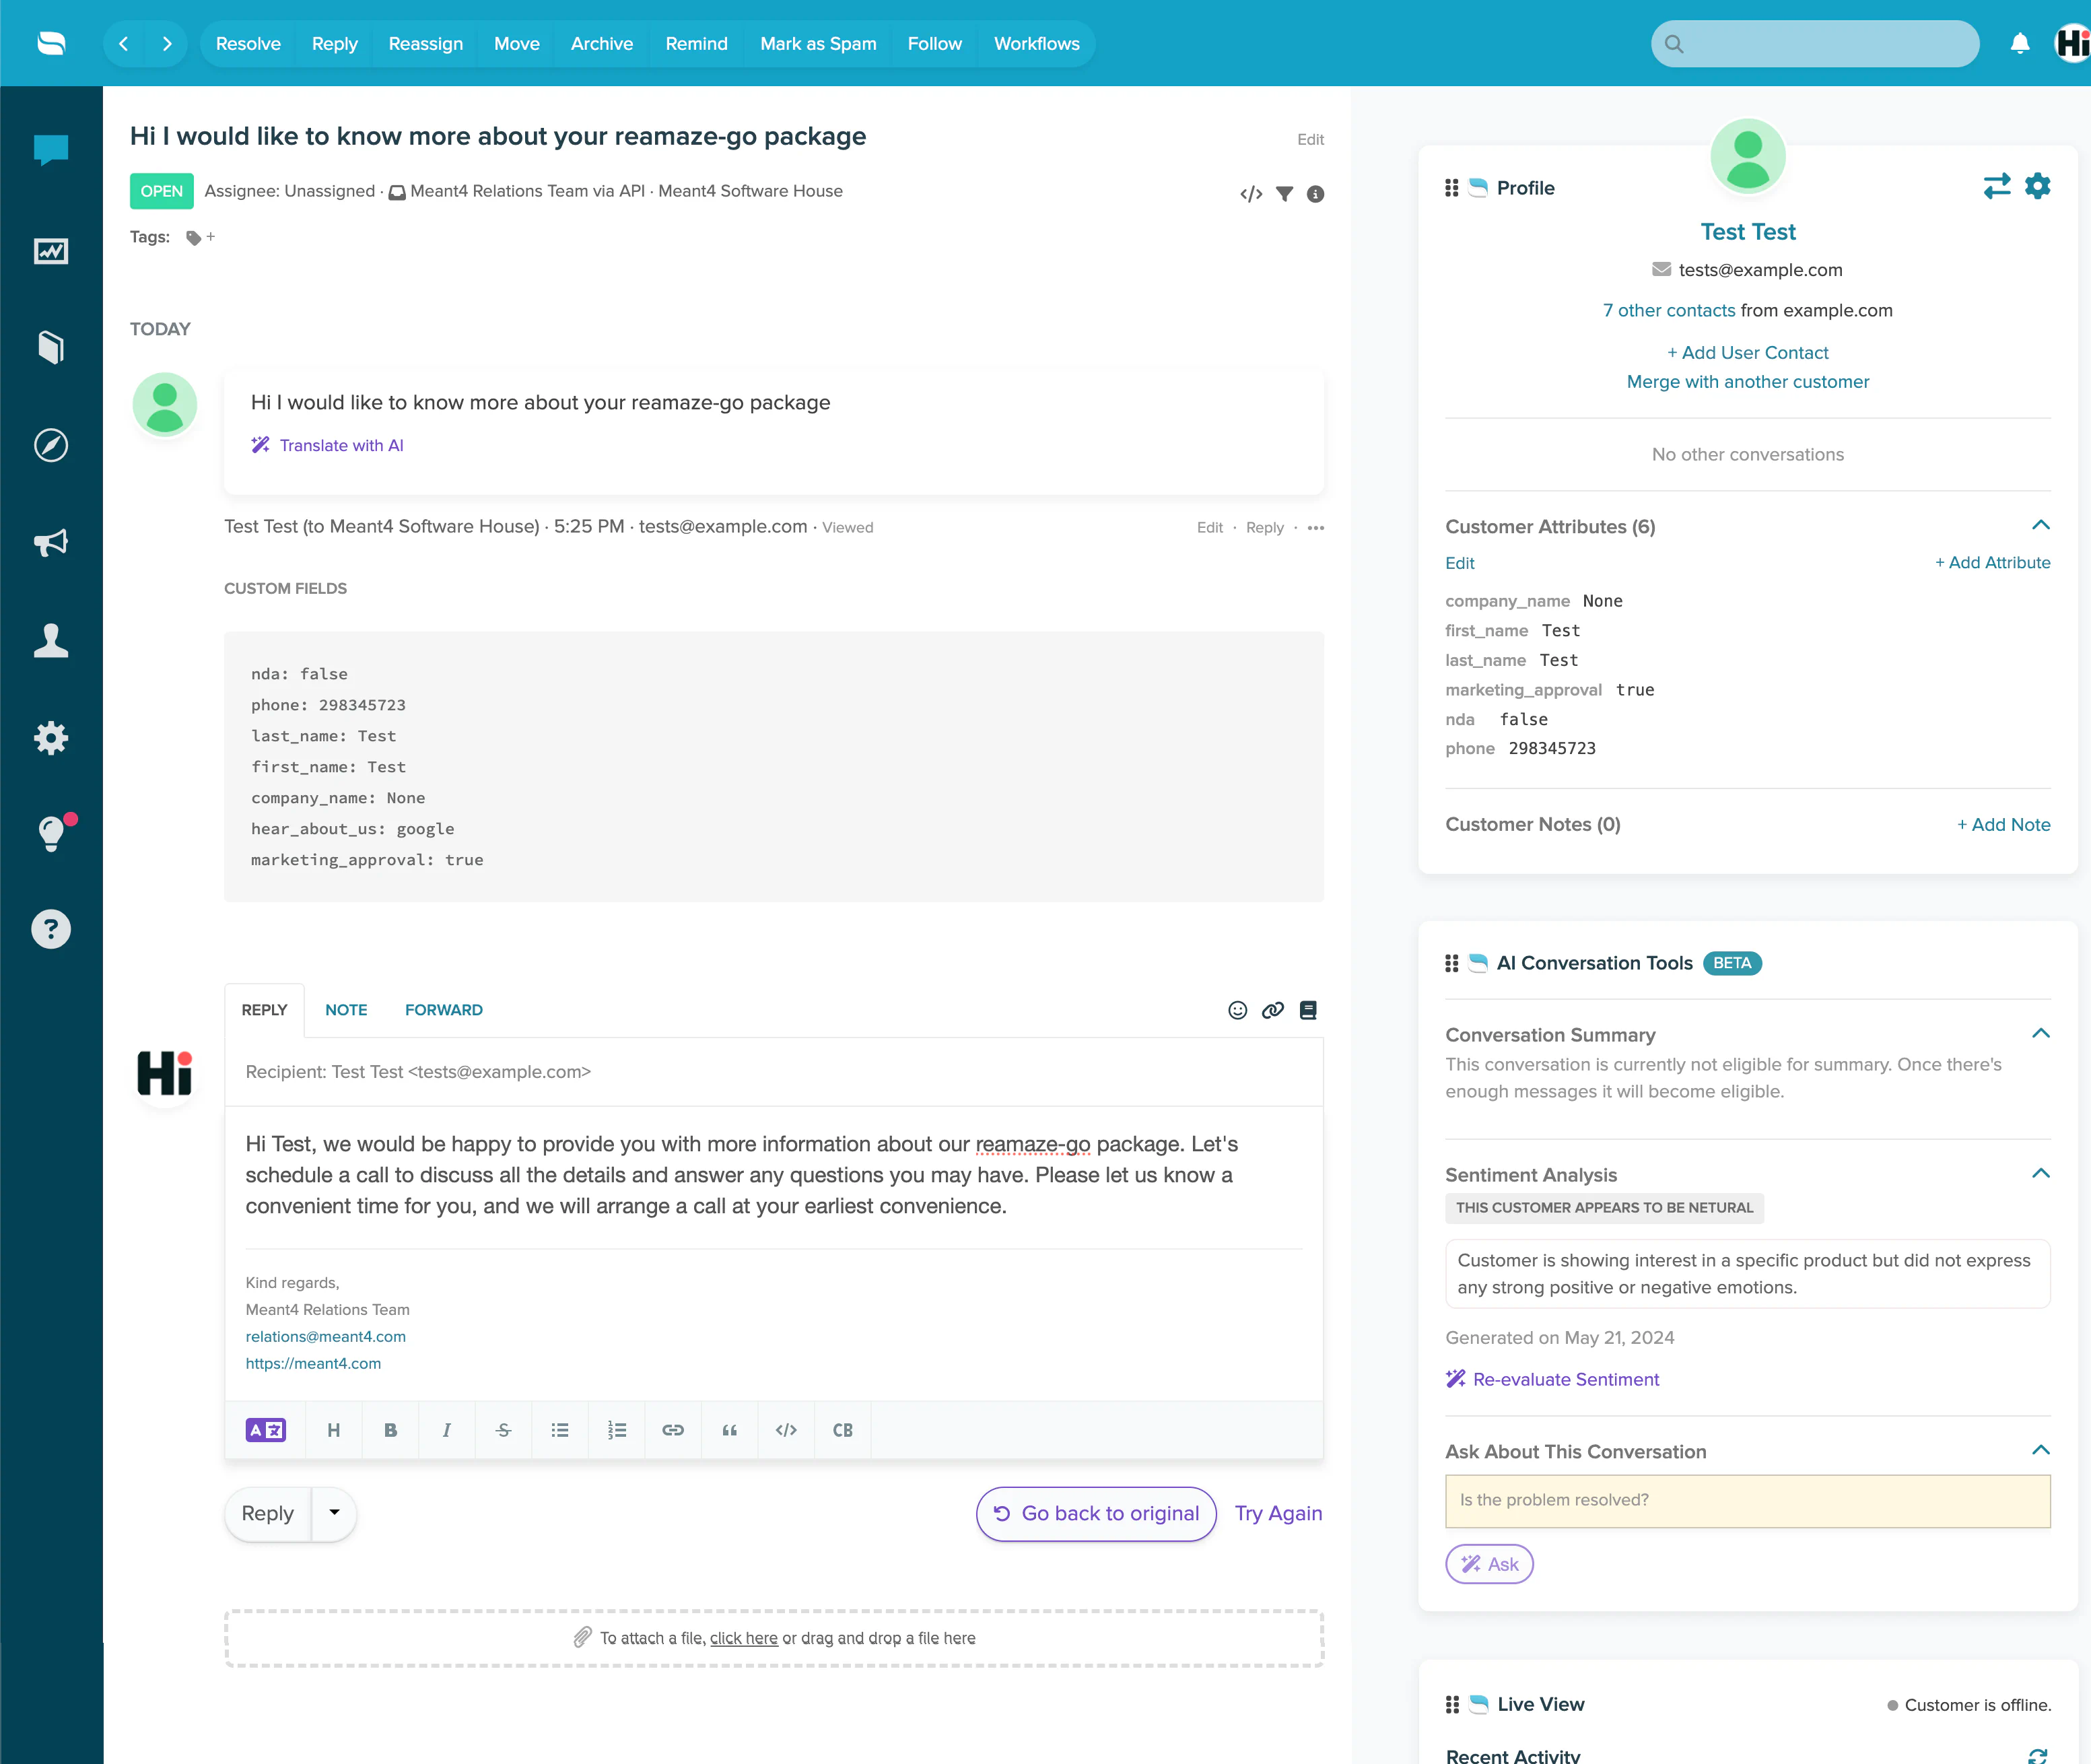
and hitting "Improve My Response" we are ending up with
| |
Going further, by clicking on "Sentiment Analysis" we receive info "Customer is showing interest in a specific product but did not express any strong positive or negative emotions."
See the picture below:
Reamaze and Slack
By using the `reamaze-go` package, a web form can be seamlessly integrated with Reamaze, allowing it to be embedded within the current company communication process, such as Slack. In this example, we have successfully integrated Reamaze with Slack. As a result, each message submitted via the web form is directed to Reamaze, where it is managed and tracked. Additionally, we receive real-time notifications in Slack, ensuring prompt attention and response to all incoming messages. This integration enhances our communication efficiency and ensures that no customer query is missed.

Summary
In this example, we've demonstrated how to integrate Reamaze with Slack. Each message sent via the web form is automatically routed to Reamaze, where it is managed and tracked. At the same time, real-time notifications are sent to Slack, ensuring that our team never misses a customer query and can respond promptly.
This is just a short example of the reamaze-go integration application, showcasing the potential to enhance your support responses with AI. But this is only the beginning! The possibilities are endless, and we are excited to help you explore them.
If you're interested in modeling a more complex process or want to learn more about how this integration can benefit your business, we'd love to hear from you. Click here to contact us and take your customer support to the next level!
Written by:

Maciej Perliński
System Architect / Senior Golang
Read more like this:

Oleksandr Dekhteruk
How to build an eCommerce website with Drupal

Oleksandr Bazyliuk
When and why to use Drupal 9 multisite?
Oleksandr Dekhteruk
Everything You need to know about Drupal hosting
Oleksandr Bazyliuk
Create a custom theme in a simple way in Drupal 9
Got idea?Let’s talk about your project
Schedule a call with us